1. JPA(Java Persistence API) 란?
JPA(Java Persistence API)는 객체 관계 매핑(Object-Relational Mapping) 기술로, Java 객체와 데이터베이스 테이블 간의 매핑을 자동으로 처리해준다.
Spring Boot JPA는 Spring Boot와 JPA를 함께 사용하여 개발하는 것을 의미한다. Spring Boot JPA를 사용하면 Java 개발자는 SQL 쿼리를 작성하는 대신 Java 코드로 데이터를 저장, 조회, 수정 및 삭제할 수 있다. 이를 통해 개발자는 더 적은 양의 코드로 더 빠르게 데이터베이스를 다룰 수 있다.
2. 동작 원리
Spring Boot JPA를 사용하면 Entity 클래스를 작성하여 데이터베이스의 테이블과 매핑할 수 있다. 이 Entity 클래스는 JPA 어노테이션을 사용하여 데이터베이스의 테이블과 매핑된다. Spring Boot JPA는 이러한 Entity 클래스를 기반으로 데이터베이스에 액세스하며, 데이터를 저장, 조회, 수정 및 삭제할 수 있다.
1) Entity Class JPA에서 데이터베이스 테이블과 매핑이 되는 Java 클래스이다.
package test.day04.domain.entity.product;

import lombok.*;
import test.day04.domain.dto.ProductDto;
import test.day04.domain.entity.BaseTime;

import javax.persistence.*;

@Entity
@Data
@AllArgsConstructor@NoArgsConstructor@Builder
public class ProductEntity extends BaseTime {
}
2) EntityManger JPA에서 데이터를 조회, 추가, 수정, 삭제하는데 사용되는 인터페이스이다. EntityManager는 엔티티 매니저 팩토리를 통해 생성되며, 엔티티 매니저 팩토리는 데이터베이스와의 연결을 설정한다. EntityManager를 사용하여 JPA 쿼리를 작성하고, 엔티티 객체를 저장, 수정, 삭제할 수 있다. Spring Boot JPA는 EntityManager를 자동으로 생성하여 사용자가 직접 생성할 필요가 없다.
3) JpaRepository JpaRepository는 데이터베이스에 액세스하기 위한 다양한 메서드를 제공한다. 이러한 메서드는 JpaRepository 인터페이스를 상속받아서 사용할 수 있다. JpaRepository는 Spring Data JPA의 일부이며, Spring Boot에서 자동으로 구성된다.
package test.day04.domain.entity.product;

import org.springframework.data.jpa.repository.JpaRepository;
import org.springframework.stereotype.Repository;

@Repository
public interface ProductEntityRepository extends JpaRepository<ProductEntity, Integer> {
}
4) 스키마 자동 생성 Spring Boot JPA는 데이터베이스의 스키마를 자동으로 생성하는 기능도 제공한다. 이를 통해 개발자는 데이터베이스 테이블을 생성하고 데이터를 추가하는 작업을 별도로 수행할 필요가 없다. Spring Boot JPA는 Entity 클래스를 기반으로 데이터베이스 테이블을 자동으로 생성한다.
package test.day04.domain.entity.product;

import lombok.*;
import test.day04.domain.dto.ProductDto;

import javax.persistence.*;

@Entity
@Table(name = "item") // 테이블명 (default: class명)
@Data
@AllArgsConstructor@NoArgsConstructor@Builder
public class ProductEntity {

    @Id // 기본키 설정
    @GeneratedValue(strategy = GenerationType.IDENTITY) // MySQL
		// @GeneratedValue(strategy = GenerationType.SEQUENCE) // Oracle
    private int p_No;
    @Column // 컬럼 지정
    private String p_Name;
    @Column // 컬럼 지정
    private String p_Content;

    public ProductDto toDto(){ // Dto <-> Entity 전환을 위함
        return ProductDto.builder()
              .p_No(this.p_No)
              .p_Name(this.p_Name)
              .p_Content(this.p_Content)
              .build();
    }

}
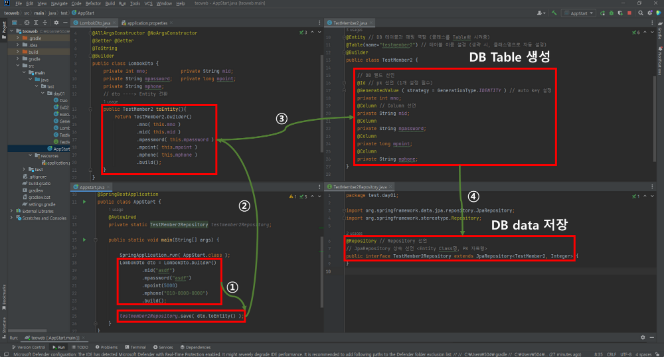
3. JPA 흐름 이해
JPA 사용 시, ‘4. application.properties’으로 설정해야 실행 가능
4. JPA 사용을 위한 application.properties 기본 세팅
💡 **application.properties 미설정 오류(내용: DB연동 실패)**

Description:

Failed to configure a DataSource: 'url' attribute is not specified and no embedded datasource could be configured.

Reason: Failed to determine a suitable driver class

Consider the following:
If you want an embedded database (H2, HSQL or Derby), please put it on the classpath.
If you have database settings to be loaded from a particular profile you may need to activate it (no profiles are currently active).
# 해결방벙: resources에 File 생성(File name: application.properties)
# = 뒤에 띄어쓰기 사용 X (띄어쓰기도 유효자리로 인식함)
# application.properties 스프링 프로젝트의 설정 파일
# 스트링부트 내장톰캣 (기본값: 8080)
# 주의사항: Eclipse랑 동시사용 불가 (종료하고 사용하기)
server.port =8080
# DB 연결 (사용할 DB 정의, 주소 입력, name 및 password 입력)
spring.datasource.driverClassName =com.mysql.cj.jdbc.Driver
spring.datasource.url =jdbc:mysql://localhost:3306/springweb
spring.datasource.username =root
spring.datasource.password =1234
# JPA 관련 설정
# 1. JPA 실행 시 자동으로, 테이블 생성 [create 1회 사용 후 주석처리 => 이후 update 사용]
spring.jpa.hibernate.ddl-auto = create
#spring.jpa.hibernate.ddl-auto = update
# 2. JPA가 자동으로 작성한 SQL console 출력하도록 설정
spring.jpa.properties.hibernate.show_sql = true
spring.jpa.properties.hibernate.format_sql = true
5. JPA 레코드 생성/수정 일자 자동 주입 방법
@MappedSuperclass 어노테이션을 이용하여 레코드 생성/수정 일자를 자동 주입할 수 있음.
1) @MappedSuperclass 어노테이션 지정할 Class 생성
package test.day04.domain.entity;

import org.springframework.data.annotation.CreatedDate;
import org.springframework.data.annotation.LastModifiedDate;
import org.springframework.data.jpa.domain.support.AuditingEntityListener;

import javax.persistence.EntityListeners;
import javax.persistence.MappedSuperclass;
import java.time.LocalDateTime;

@MappedSuperclass
// 기능: @MappedSuperclass로 지정한 클래스(부모)를
// Entity 클래스(자식)에서 상속할 경우 클래스(부모)의 필드도 컬럼으로 인식할 수 있게 됨
@EntityListeners(AuditingEntityListener.class)
// 기능: Entity를 DB에 적용하기 전과 적용한 후에 커스텀 콜백을 요청할 수 있는 어노테이션,
// 매개변수(인자)는 JPA에서 제공하는 AuditingEntityListener.class를 넘기면 기능작동 됨
public class BaseTime {

    @CreatedDate // Entity(Record) 생성날짜 필드에 주입
    private LocalDateTime cDate;
    @LastModifiedDate // Entity(Record) 수정날짜 필드에 주입
    private LocalDateTime uDate;

}
2) 자동 주입시킬 Entity에 @MappedSuperclass 클래스 상속 부여
package test.day04.domain.entity.product;

import lombok.*;
import test.day04.domain.dto.ProductDto;
import test.day04.domain.entity.BaseTime;

import javax.persistence.*;

@Entity
@Table(name = "item")
@Data
@AllArgsConstructor@NoArgsConstructor@Builder
@EqualsAndHashCode(callSuper=false)
public class ProductEntity **extends BaseTime** {

    @Id
    @GeneratedValue(strategy = GenerationType.IDENTITY)
    private int pNo;
    @Column
    private String pName;
    @Column
    private String pContent;

    public ProductDto toDto(){
        return ProductDto.builder()
              .pNo(this.pNo)
              .pName(this.pName)
              .pContent(this.pContent)
              .build();
    }

}
3) Stringboot Start class에 @EnableJpaAuditing 어노테이션 적용
package test.day04;

import org.springframework.boot.SpringApplication;
import org.springframework.boot.autoconfigure.SpringBootApplication;
import org.springframework.data.jpa.repository.config.EnableJpaAuditing;

@SpringBootApplication
@EnableJpaAuditing // JPA Auditing(감시 기능) 활성화하는 어노테이션
// 내용: 레코드 생성/수정 일자 자동주입 기능을 사용하기 위해 Stringboost Start Class에 선언 필요
public class AppStart04 {
    public static void main(String[] args) {
        SpringApplication.run(AppStart04.class);
    }
}'SpringBoot' 카테고리의 다른 글
| Springboot - 시큐리티(Security) (0) | 2023.06.14 |
|---|---|
| SpringBoot - @Slf4j 이해 (0) | 2023.04.28 |
| SpringBoot - @Autowired 이해 (0) | 2023.04.28 |
| SpringBoot - @RequestMapping 활용 (0) | 2023.04.28 |
| SpringBoot - @Controller, @RestController 비교 (0) | 2023.04.28 |
